Add-ins to get the extended classes in DAX 2009

In AOT if you want to know for specific classes , what all child classes are extending this than have a look in following add-in .

Step1 : Create Job with following code.

static void TST_getExtendedClasses(Args _args)
{
    TreeNode        treeNode;
    SysDictClass    dictClass;
    List            extendedClassList;
    ListEnumerator  listEnumerator;
    SysContextMenu  contextMenu;
    Str             className, message;
    Counter         i;
    ;

    SysContextMenu::startedFrom(_args);

    contextMenu = _args.parmObject();
    treeNode    = contextMenu.first();


    i = contextMenu.selectionCount();

    if (treeNode.AOTparent().AOTname() == "Classes")  // Run only if it's opened from classes node
    {
        while (i >= 1)
        {

            dictClass           = new SysDictClass(className2Id(treeNode.AOTname()));
            extendedClassList   = dictClass.extendedBy();

            if (extendedClassList.elements())
            {
                listEnumerator = extendedClassList.getEnumerator();
                message = strfmt("Class %1 is extended by %2 subclasses.",treeNode.AOTname(),int2str(extendedClassList.elements()));
                setprefix(message);
                while (listEnumerator.moveNext())
                {
                    info(ClassId2Name(listEnumerator.current()));
                }

            }
            else
            {
                info(strfmt("Class %1 is not extended .",treeNode.AOTname()));
            }

            treeNode = contextMenu.next();
            i--;
        }
     }
}

Step2 : Create Menu Item with label as Get Extended classes and point to above job.

Step 3: Add above created menu item to the Menu 'SysContextMenu'.

Now if you do right click on class in AOT , than it should


When you select option Get Extended Classes , you will get the output as
Enjoyyy!!!!!!!!!

X++ Code to check the Invoice marked for settlement

Settlement feature allows you to select the open transactions(Vendor / customer)  and then you can post the payment journal for the same. I mean whenever you post PO or SO , all the payment details  will be sitting in Open transactions.
And these open transaction will be used latter for settlement , when you pay to the Vendor or receive the amount from customer.
Following Job illustrates how to check whether invoice is marked for settlement or not. The reason is if invoice is marked for settlement than those invoices cannot be used for posting in other journals.

For illustration i am using vendor invoices , second parameter (_buffer) should be ledgerJournalTrans , custTable or vendTable record for which you will be going to use the specified invoice.

boolean checkRecordMarked(InvoiceId _invoiceId, Common _buffer)
{

        boolean ret;
        ;
        select vendTransOpen
        join   vendTrans
        where  vendTransOpen.AccountNum == vendTrans.AccountNum &&
               vendTransOpen.RefRecId   == vendTrans.RecId      &&
               vendTrans.Invoice        == _invoiceId;


        specTransManager = SpecTransManager::construct(_buffer);
        ret = specTransManager.existForOtherSpec(vendTransOpen.company(), vendTransOpen.TableId, vendTransOpen.RecId);

        return ret;

}

X++ Code to Create Ledger and Inventory Journal names

Following job creates the journal names for all the different types of Journal type that have been defined in Ledger and  Inventory modules.
These journal names will be used for Posting Inventory and Ledger Journals in DAX.
 
void create_JournalNames()
    {
         
        LedgerJournalType     ledgerJournalType;
        LedgerJournalName   ledgerJournalName;
        Enumerator                  enumerator;
        DictEnum                     dictEnum;
        InventJournalName     inventJournalName;
        Counter                        i;
        InventItemType            inventItemType;
        InventJournalType       inventJournalType;
        str                                 itemTypeTxt;
        ;

        select firstonly numseqTable ;

        dictEnum = new DictEnum(enumnum(ledgerJournalType));

        // This block will loop until the end element of enum
        for (i=0;idictEnum.values();i++)
        {
            ledgerJournalType = str2enum(LedgerJournalType,dictEnum.value2Name(i));

            ledgerJournalName.clear();
            ledgerJournalName.initValue();

            ledgerJournalName.JournalName   = strfmt("%1%2_J",substr(enum2str(ledgerJournalType),1,3),i);
            ledgerJournalName.VoucherSeries = numseqTable.NumberSequence;
            ledgerJournalName.Name          = strfmt("%1 Journal",ledgerJournalType);
            ledgerJournalName.JournalType   = ledgerJournalType;

            if (ledgerJournalName.validateWrite())
                ledgerJournalName.insert();

        }

        dictEnum = new DictEnum(enumnum(inventJournalType));

        for (i=0;idictEnum.values();i++)
        {
            inventJournalType = str2enum(inventJournalType,dictEnum.value2Name(i));

            inventJournalName.clear();
            inventJournalName.initValue();

  
inventJournalName.JournalNameId   =strfmt("%1%2_J",substr(enum2str(inventJournalType),1,3),i);

            inventJournalName.Description     = strfmt("%1 Journal",inventJournalType);
            inventJournalName.JournalType     = inventJournalType;

            if (inventJournalName.validateWrite())
                inventJournalName.insert();

        }

    }

Enjoyyyy X++ Cooding !!!!!

Setup Email Alerts and X++ Code to Send Mail in DAX 2009.

Following steps illustrates how to setup and activate Email Alerts in DAX 2009.

In Ax we have two types of Alerts.
    1 ) Pop-Up Alerts , shown in AX Forms as pop-up windows.
    2 ) Email Alerts , where alert message will be sent to users by mail.  In other words its extended
         version of Pop-up Alerts.

How it Works :
   a ) For every alert ax creates record in SysOutgoingEmailTable and  
        SysOutgoingEmailData.
   b ) Then Email distributor batch(Class->SysEmailBatch->run method)  job reads the message
         from the above table and after validating execute the mail.

Now we will see what all setups are required for activating second type of alert.

Step1 : Activates the Alerts feature for user in options form .
             Go to  Tool-->Options  , set show email alerts  as


 Step 2 :  Set Email Parameters , Administration->Setup->Email Parameters
                 Define parameters like which SMTP  Server to use for sending mails and credentials
                 by which mail will be sent to users.


Step 3 : Add Email distributor batch to BatchJob Queue. This job will be responsible for sending mails to users. So if you are not receiving any email it means u have not scheduled this batch job to run.
             Administration->Periodic->Email-Processing--->Batch
Set the recurrence as No End date and minutes as 15-30 minutes.

Step 4 : Check the Batch Job queue for Email distributor batch job , you should find new record
               in batch queue as
               Basic-->Inquiries-->Batch Job
               For this record Click on Alerts and select check box "Error" . It means whenever this
               batch job fails you will get alert.

Incase of any failure you can debugg SysEmailBatch Class run method .

Step 5: Set up Email Templates and attach to EventParameters.
              Basic -> Setup -> Alerts -> Alert Parameter.

Step 6 :   Job to test whether u have configured correctly or not.
                  static void Mail_Send(Args _args)
                 {

                       EventParameters eventParameters = EventParameters::find();
                      SysUserInfo             sysUserInfo;
                     UserInfo                userInfo;
                     ;

                    // SysUserInfo has Alert and email info
                    sysUserInfo = SysUserInfo::find(curuserid());

                     // UserInfo has the language info
                    //userInfo = xUserInfo::find(false, eventRule.UserId);
                                         
 SysEmailTable::sendMail(eventParameters.AlertTemplateId,userInfo.Language,sysUserInfo.Email);


Even workflow framework uses same alert setups for sending mails for approval and task notifications.

Cool !!!!!!

Open doc , excel and Pdf in DAX 2009 Form

Hi,

I will be illustrating how we can load files like doc , excel and pdf on forms in Axapta 2009.
Advantages
      1.  You will have control on document like set rights for read only etc.
      2.  User will be in AX Workspace , no need for switching the windows between AX and Doc
           Viewer.

Steps  1.  Create form , add ActiveX Control of type Microsoft Web Browser in Design
            2.  Name the Control as CtrlActiveX
            3.  On Form Init Method , after super ()
                        CtrlActiveX.navigate("filePath");         // you can load URL for browsing

As show below in Image
When you run the form , you will see pdf inside form


Enjoyy File Viewing in DAX 2009.

X++ code to validate only numbers in string

Following job that illustrates how we can use regular expressions in axapta for validating only numbers in string.

static void TextBuffer_regularExpression(Args _args)
{

    TextBuffer txt = new TextBuffer();
    str msg = "98797897";
    ;


    txt.setText(msg);
    txt.regularExpressions(true);   // activate regular expr in search


     // Regular expression to validate only digits
     if (txt.find("^[0-9]+$"))
    {
        info("string contains only numbers");
    }

}

X++ Code to get the Ranges / Criteria from Query

Hi ,

Following Job illustrates how we can get the criteria / ranges specified by the user in the run-time Query criteria dialog.

static void Query_getRanges(Args _args)
{
    Query                   query = new Query();
    QueryRun                queryRun;
    QueryBuildDataSource    qbd;
    CustTable               custTable;
    QueryBuildRange         range;
    int                     cnt, i;
    ;

    qbd = query.addDataSource(tablenum(CustTable));

    queryRun = new QueryRun(query);

    queryRun.prompt();   // To Prompt the dialog

    cnt = queryRun.query().dataSourceTable(tablenum(CustTable)).rangeCount();

    for (i=1 ; i<=cnt; i++)
    {
        range = queryRun.query().dataSourceTable(tablenum(CustTable)).range(i);
        info(strfmt("Range Field %1, Value %2",range.AOTname(),range.value()));
    }

    while (queryRun.next())
    {
        custTable = queryRun.get(tablenum(CustTable));
        info(strfmt("Customer %1, Name %2",custTable.AccountNum, custTable.Name));
    }
}

Enjoyyy !!!!

X++ code to Count Records in Query

Following code illustrates how we can use SysQuery::countTotal() method to get the number of records in Query.

static void Query_cntRecords(Args _args)
{
    Query                query = new Query();
    QueryRun             queryRun;
    QueryBuildDataSource qbd;
    ;
   
    qbd = query.addDataSource(tablenum(CustTable));
    queryRun = new QueryRun(query);
   
    info(strfmt("Total Records in Query %1",SysQuery::countTotal(queryRun)));
   
}

X++ code to Create Cue in DAX 2009

RoleCente's main purpose is to show various data on homepage which user will get to see all at a glance . Cue is also one among them .
Basically Cues in DAX 2009 are used for visual representation of data . In Technical terms Output of Query is represented graphically.

How Cue Works 
1. Open PurchTable form , click on advanced filter (Ctrl + F3)
2. Give any criteria ( status == Invoiced) and click on modify -->Save as Cue
 3. Save the Cue by assigning Cue Id as "Total_POInvoiced" , Security profile(who all can use)

4. Created Cue can be viewed in Basic-->Setup->RoleCenter->Edit Cues.


5. In order to deploy , Edit Role center homepage
             a. Click on Add new webPart and select Cues Web Part.
             b. Click on modify webpart and select above created Cue "Total_POInvoiced" in    
                 property      sheet .
             c. Click on Apply and Ok .
             d. When you exit edit mode , you will see total number of pending Invoices as image .

6. If you click on Cue "Total Invoiced PO " on Rolecenter you will be navigated to form which will show only invoiced purchase orders.

Technically :
When you create Cue , record gets created in CuesQuery Table with Formname , menuItemName and Query created from user criterias.
So when user click on Cue , It will take you to Form from where you created Cue by using the value from menuItemname.

Following X++ Job Creates Cue for customer form.

static void DEV_createCue(Args _args)
{
    CuesQuery       cuesQuery;
    Query           query = new Query(querystr(Cust));
    ;

    cuesQuery.clear();

    cuesQuery.CueId         = "TST_CustQuery2";
    cuesQuery.Caption       = "Cue test for CustTable";
    cuesQuery.CueVersion    = 1;
    cuesQuery.CreatorUserId = curUserid();
    cuesQuery.FormName      = "CustTable";
    cuesQuery.DataSourceName = "CustTable";
    cuesQuery.Query = query.pack();
    cuesQuery.ClientMenuItemName = "CustTable";
    cuesQuery.CueMin = 1;
    cuesQuery.CueMax = 10;
    cuesQuery.Threshold = 0;
    cuesQuery.ThresholdCriteria = CuesThresholdCriteria::None;
    cuesQuery.SecurityAccessFlag = CuesSecurityFlag::SpecifiedProfiles;
    cuesQuery.AdditionalValFunc = CuesAdditionalValFunc::None;
    cuesQuery.AdditionalValField = " ";
    cuesQuery.AdditionalValTable = " ";

    if (cuesQuery.validateWrite())
    {
        cuesQuery.insert();
        info(strfmt("Cue %1 Created with SecurityRights as %2",cuesQuery.CueId,cuesQuery.SecurityAccessFlag));
    }
}

Cool....

How to Create new Role Center in DAX 2009

Role center is  EnterPrise Portal Page which is used to show data , reports, pending activities and awaiting actions as per user role in the company.
Means whenever ax starts User will get homepage where he will see the data as per his role in the organization and can be personalized further to suit his requirements.
In order to have this feature available one should install and configure EP on his/her machine/server.
 After Installation do following steps,
  1.  Once you done with RoleCenter and EP installation ,
  2.  Go to Basic->Setup->RoleCenter-->Initialize Role Center will get some default profiles 
  3.  Admin-->Setup->User Profiles , click button Import and select from AOT
  4.  Default profiles (Role Centers) will be imported and You can start using by adding your userid to that select profile.
  5. Restart the AX Client and wait till default Home Page get load.

In Order to Create New RoleCenter in DAX 2009 , Have a look in following snap..

As shown in the figure, nodes under Develop the content are different components that are used to represent various data like SSRS Report , OLAP Cube for Data in BarChart etc.                      
It doesn't mean that all these are mandatory steps while creating new role center. For testing purpose just make use of Cue as specified in below image.

  Enjoy with your new role center !!!!!!!

View Embedded Resources in Ax

In DAX 2009 we have provision to view the existing resources like icons,images that are used on User Interfaces.
System will display all the resources with their Resource Id and image type. So whenever you want to display images and don't know the id then go for embedded resources as show in following snap.

Path : Tools-->Development tools-->Embedded Resource 

How to Install DAX on Stand alone Windows XP system

Unfortunately setup of AX on the computer outside a domain is prohibited by installer. But there is a trick for doing such thing and works good.
This trick is tested under Windows XP SP2, it does not work on Vista.

For Ax 4.0 Windows XP sp2 is required , for DAX 2009 Windows XP sp3 is required.

Here are steps of the trick (borrowed from AxForum):

1. Change the value of there registry key HKEY_LOCAL_MACHINE\SYSTEM\ControlSet001\Control\ComputerName\ActiveComputerName to any value which does not match the name of your computer
2. Set value of environment variable named "UserDnsDomain" to any other value
3. Run setup.exe
4. Restore values, changed on the steps 1, 2
5. Go to client and server setup in control panel and change computer name to the real name of your computer

In order to install EP,Workflow for DAX 2009 on Windows XP we need to install share point services on Windows XP . Please visit the below link

Install SharePoint on WindowsXP


Enjoy installing DAX .........

X++ Class to Convert WebForm to Asp.net AX User control

As you all know from Version 5.0 EP development should be done in visual studio.
this means all the existing webforms developed in version 4.0 should be converted to asp.net ax user control.
This could have been taken care during the upgrade process , but unfortunately its not.

So please download the following class to convert the webforms to asp.net ax user control. this class has been developed by MS , but i don't know how come they have missed to include the same in AOT.
Not an issue , now you can do the same by downloading the following class.


Download SysEPWebFormConverter


Note Pre-requisite :
In order to test ,please create two webform named as WebForm1 and webForm2.
When you run the class you will find the new project containing converted asp.net ax user control in the project.

Enjoyyyyy!!!!!!.

UtilElements System Table , Objects usage log table in ax .

UtilElements stores the meta-data of all the AOT objects and even this table can also be used as log for tracking creation and modification of AOT objects.
And UtilElements is not RDBMS Table , whereas it uses filesystem to store data.

AOT Path for all system tables : \AOT\System Documentation\Tables\
Can be used for ..

1. To track the object creation and modification during development. i,e When you create a new or modify existing node in AOT , like table,field,report,index etc ax kernel creates/updates records in UtilElements table .

2. Even forms/reports accessed by the end-user can be tracked .

Limitation of this log table is we can't track the deleted objects in AOT.

So if you want to track who modified what object , this is the best place to look in.

X++ Code to Export AOT Object / automatic backup of xpo's.

we need to take daily backup of our development (interms of xpo) , but we all always forget becuase of our hectic work schedules.
So use the following job and build batch application to take backup of developement in terms of xpo .
We can take aod also but the size will be more and needs to stop AOS everytime .

Following job illustrates how to export/backup all AOT Classes object.

void DEV_ExportTreeNodeExample()
{

TreeNode treeNode;
FileIoPermission perm;

#define.ExportFile(@"c:\AOTclasses.xpo")
#define.ExportMode("w")
;

perm = new FileIoPermission(#ExportFile, #ExportMode);
if (perm == null)
{
return;
}

perm.assert();

treeNode = TreeNode::findNode(@"\Classes");
if (treeNode != null)
{

// BP deviation documented.
treeNode.treeNodeExport(#ExportFile);
}

CodeAccessPermission::revertAssert();
}

Enjoy !!!!!!!!

Build your own context menu on Form field.

Context menu on field are nothing but the list of features shown when you do right click on field like filter by field,by selection ,setup etc.
Following code illustrates how you can override the standard context menu and build your own .
Best use of this is in-case of display methods where filter by field and selection are not available.
Override the standard context method available on Form fields.

public void context()
{

PopupMenu menu ;
Str filterValue;
int selectedItem;
int filter, removeFilter;
;

//super(); // Comment standard menu

menu = new PopupMenu(element.hWnd());
filter = menu.insertItem("Filter");
removeFilter= menu.insertItem("Remove Filter");

selectedItem = menu.draw();
filterValue = element.design().controlName("Table1_Usn").valueStr();

switch (selectedItem)
{
case filter :
Table1_ds.filter(fieldnum(table1,Usn),filterValue);
break;

case removeFilter :
Table1_ds.removeFilter();
break;

}
}

For illustration i have used my own objects , So please test with your own valid objects.

Remove HTML Tags from String

Following Job illustrates how to strip htmltags from string.

static void Dev_StripHTML(Args _args)
{
Str htmlSource;
;

htmlSource = "Test" +
"HTML Tags Removed ";

info(Web::stripHTML(htmlSource));


}


X++ Code to Create Purchase Order and Post the Invoice.

Following Job creates the Purchase order from code and post the invoice by making use of PurchFormLetter class.
If you don't have demo data , please test with your input values.


static void Dev_CreatePO_and_Invoice(Args _args)
{

NumberSeq numberSeq;
Purchtable Purchtable;
PurchLine PurchLine;
PurchFormLetter purchFormLetter;

;

ttsbegin;
numberSeq = NumberSeq::newGetNumFromCode(purchParameters::numRefPurchaseOrderId().NumberSequence,true);

// Initialize Purchase order values
Purchtable.initValue();
Purchtable.PurchId = numberSeq.num();
Purchtable.OrderAccount = '3000';
Purchtable.initFromVendTable();

if (!Purchtable.validateWrite())
{
throw Exception::Error;
}
Purchtable.insert();

// Initialize Purchase Line items
PurchLine.PurchId = Purchtable.PurchId;
PurchLine.ItemId = 'B-R14';
PurchLine.createLine(true, true, true, true, true, false);
ttscommit;

purchFormLetter = purchFormLetter::construct(DocumentStatus::Invoice);
purchFormLetter.update(purchtable, // Purchase record Buffer
"Inv_"+purchTable.PurchId, // Invoice Number
systemdateget()); // Transaction date


if (PurchTable::find(purchTable.PurchId).DocumentStatus == DocumentStatus::Invoice)
{
info(strfmt("Posted invoiced journal for purchase order %1",purchTable.PurchId));
}
}

Change the documentstatus to packingSlip , if you want to post packing slip.
Enjoy ....Invoicing through Code.

TextBuffer Class to replace the special characters in string.

TextBuffer class can be used to replace the text/characters in the string.
Usually its used to replace the special character with escape sequence so that string(data with special character) can be inserted into the database.

Following job illustrates how to achieve this.

static void Dev_ReplaceTxt(Args _args)
{

TextBuffer buffer = new TextBuffer();
Str message;
;

message = " hi hello's how r u's ";
message += " How r u doing's wujer's * ? ' what ur mot's anbej's";

buffer.setText(message);
buffer.replace("[*?']","\\'"); // replace special character with escape sequence
info(buffer.getText());

}

Code to Display Expiry date Message at Status Bar

Following job illustrates how you can display custom message in the status bar next to alerts. ( Mean , At bottom where you will find company,layer,currency info).

static void Dev_setStatusLineText(Args _args)
{

str msg;
;

msg = "Expiry date :"+date2str(xinfo::expireDate(),123,2,4,2,4,2);

// Force the text to be shown
xUserInfo::statusLine_CustomText(true);
infolog.writeCustomStatlineItem(msg);

}

X++ code to write data to Event viewer

Usually it will be difficult to monitor/debug Batch Jobs running on server . For e.g if something goes wrong than we can't find out why.
So we can make use of Eventviewer instead of infolog and monitor the status by checking the eventviewr .
Following Job illustrates how to write to event viewer.

static void Dev_Write2EventViewer(Args _args)
{

System.Diagnostics.EventLog eventlog;
Str logSource;
Str logName;
;

logSource = "Dynamics Ax";
logName = "Dynamics Ax Log";

// check if the log already exists
if(!System.Diagnostics.EventLog::SourceExists(logSource))
{
// create new log
System.Diagnostics.EventLog::CreateEventSource(logSource, logName);
}

eventlog = new System.Diagnostics.EventLog();
eventlog.set_Source(logSource);


eventlog.WriteEntry("Info Message");
eventlog.WriteEntry("Warning Message" , System.Diagnostics.EventLogEntryType::Warning);
eventlog.WriteEntry("Error! Please check the stack trace below. \n\n" +
con2str(xSession::xppCallStack()), System.Diagnostics.EventLogEntryType::Error);

info("Check the event viewer!");


}


Enjoy ....!!!! Batch Jobs...

How to Debugg Form Controls in Ax

As you all know X++ debugger won't work , when we place breakpoints in form controls. So we all end-up in writing the breakpoint statement in form control method.

So have a look
Debug Form Controls in Ax

Enjoy Debugging !!!!

DAX Form Tool - Get Form Details at One Place

As you all know in ax whenever we want to know form detail, always we used to do..
1. Right click on form and then click on Setup and then we get the AOT->Form path.
2. To check the datasource ,like which table its using and joined to which datasource.

I have developed tool called as Dev_FormTool which will help you to get all form details in one place.

Download
Have a look ....

Make Form/Report run automatically when dynamics Ax Starts

When ax starts Kernel Creates an instance of Info class .
Info contains StartupPost() method used to execute the code every time ax starts.

Following example opens InventTable Form automatically when you start ax.

void startupPost()
{
SysSetupFormRun formRun;
Args args = new Args();
;

args.name(formstr(InventTable));
formRun = classfactory::formRunClassOnClient(args);
formRun.init();
formRun.run();
formRun.detach();
}

So if you have any task that has to be executed every time ax start , then this is the best place to put your code.

Import Data on Startup without User Interaction.

Particularly during the test phase , its useful to import the data without user interaction.
You can do this from command line with xml file as parameter.

Steps 1 : Create an XML File as below, which specifies
a. axapta version
b. Name and Location of LogFile
c. Path of data file to be imported.


Steps 2 : Open a commandLine window and type
ax32.exe –StartupCmd=AutoRun_c:\folder\filename.XML

SysAutRun Class conatins macro for XMl Elements.
For e.g can be used for importing XPO's at startup.

AX Application Explorer in Visual Studio

Check out the new tool developed by the Developer and partner tool group of dynamics Ax for Ax style coding in visual studio.

AX Application Explorer in Visual studio


Enjoy!!!

Pre-Requisites to install Dynamics Ax 2009 and Enterprise Portal

Dynamics Ax 2009 Installation Pre-requisites.
In all cases, you must be a member of the Administrators group on the local computer where you are installing a component. The following table lists permissions that are required in addition to administrator access on the computer.


Components Required.

Connecting MSSQL DataBase with X++ Code.

As part of Customer requirements , sometimes we need to connect to DataBase otherthan Axapta DataBase. So let us explore how it can be done with X++ code.
In Ax using ODBCConnection and LoginProp its possible to connect to Database on remote server, as illustrated in the following example.I tried the following code on MSSQL Server.

static void test_ODBCConnection(Args _args)
{

LoginProperty loginProp;
ODBCConnection conn;
Resultset resultSet, resultSetCount; // get record
Statement statement1, statement2; // Create SQL Statement
ResultSetMetaData metaData ; // get Record metadate like columnname.
;

// Set Server Database
loginProp = new LoginProperty();
loginProp.setServer('SON15092');
loginProp.setDatabase('AdventureWorksDW');

// Create Connection and SQL Statement
conn = new ODBCConnection(loginProp);
statement1 = conn.createStatement();
resultSet = statement1.executeQuery("SELECT * from DimTime");

while (resultSet.next())
{
metaData = resultSet.getMetaData();
info("Column Name :"+metaData.getColumnName(1)+" Value ="+resultSet.getString(1));
}
}

Enjoy, X++!!!!!!

File Operation using WinAPI in Dynamics Ax

Finding files with WinAPI

Axapta’s WinAPI class has a bunch of static methods to handle files. The code example below shows how to utilize some of these methods to find files.

The two methods used to fetch all files matching the search criteria are findFirstFile() and findNextFile(). Don’t forget to clean up after yourself with findClose().

The code also uses three different find methods:

*
fileExists(_name) returns true, if _name is an existing file
*
folderExists(_name) returns true, if _name is an existing file or folder
*
pathExists(_name) returns true, if _name is an existing folder

The example uses the infolog for output. As with any infolog beware of performance and limitation to 10.000 lines.


static void Test_WINAPI(Args _args)
{

#File

FileName fullFileName(FileName _path, FileName _fileName)
{
FileName pathName;
FileName fileName;
FileName fileExtension;
;
[pathName,fileName,fileExtension] = fileNameSplit(_fileName);
return _path + '\\' + fileName + fileExtension;
}

void findFiles(FileName _path,
FileName _fileName,
boolean _inclSubDir = true,
FileName _prefix = fullFileName(_path,_fileName))

{

FileName fileName;
int hdl;
;
setprefix(_prefix);
if (WinAPI::folderExists(_path))
{
[hdl,fileName] = WinApi::findFirstFile(fullFileName(_path,_fileName));
while (fileName)
{
if (WinAPI::fileExists(fullFileName(_path,fileName)))
info(fileName);
fileName = WinApi::findNextFile(hdl);
}
WinApi::findClose(hdl);
if (_inclSubDir)
{
[hdl, fileName] = WinAPI::findFirstFile(_path+'\\'+#AllFiles);
while (fileName)
{
if (strlwr(fileName) != strlwr(_fileName) &&
strlwr(fileName) != strlwr('.') &&
strlwr(fileName) != strlwr('..') &&
WinAPI::pathExists(fullFileName(_path,fileName)))

findFiles(fullFileName(_path,fileName), _fileName, _inclSubDir,
fileName);


fileName = WinApi::findNextFile(hdl);

}
WinApi::findClose(hdl);

}
}
}
findFiles('c:\\Program Files','*.doc');

}

How to add "Go to main table Form" Link in Ax

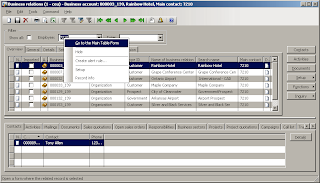
Go to the Main Table Form is a feature of Dynamics AX, which allows users to jump to the main record just by right-clicking on the field and selecting the Go to the Main Table Form option. It is based on table relations and is available for those controls whose data fields have foreign key relationships with other tables.

Because of the data structure integrity, this feature works most of the time. However, when it comes to complex table relations, it does not work correctly or does not work at all. Another example of when this feature does not work automatically is when the form control is not bound to a table field. In such situations, Go to the Main Table Form has to be implemented manually.

How it works : ,
we will modify the Business relations form in the CRM module to make sure that the Employee filter at the top of the form allows users to use the Go to the Main Table Form feature from the context menu.

1. Open the smmBusRelTable form in AOT, and override jumpRef() of the EmployeeFilter control with:

public void jumpRef()
{


EmplTable emplTable;
Args args;
MenuFunction menuFunction;
;
emplTable = EmplTable::find(this.text());
if (!emplTable)
{
return;
}
args = new Args();
args.caller(element);
args.record(emplTable);
menuFunction = new MenuFunction(
menuitemdisplaystr(EmplTable),
MenuItemType::Display);
menuFunction.run(args);
}

2. To test the result, open CRM | Business Relation Details, make sure an employee number is specified in the Employee filter, and right-click on the filter control. Notice that the Go to the Main Table Form option, which will open the Employee form, is now available:

How to use Dialog in Dynamics Ax.

If you came accross a requirement , where you need to collect the information and then executes a task . In such scenario Please make use of RunBase class.
Advantage of RunBase class
1. It provides dialog for presenting and collecting the information from user.
2. Pack/Unpack methods , for storing the last value entered by the user.
3. Progress bar ,for long time process where in you can show a progress bar.
4. Validate method , to validate the data entered by the user in the dialog.

you can refer tutorial in AOT->Classes->tutorial_RunBaseForm .

How to Use Temporary Table in Form

Temporary table(Table whose property temporary set to "yes") is not persistent media , so at run-time you have to populate the temporary table and attach the same to the form/report.
For illustration purpose ,I am using inventTable data and attaching the items whose group is Parts.
Steps

1. Create temporary table as TmpTestTable with 3 fields(ItemId,Itemname,ItemGroup).
2. Create a form as TempTestTable and attach the table as datasource
3. Create a new method on the form and copy the following code

TmpTestTable populateRecords(ItemGroupId _itemGroupId)
{

TmpTestTable tmpTable;
InventTable inventTable;
;

while select inventTable
where inventTable.ItemGroupId == _itemGroupId
{
tmpTable.Itemid = inventTable.ItemId;
tmpTable.ItemName = inventTable.ItemName;
tmpTable.Itemgroup = inventTable.ItemGroupId;
tmpTable.insert();
}

return tmpTable;
}

4. Call the above method in init() after super as below
public void init()
{

super();

// Call the setTmpData method to attach records to datasource
TmpTestTable.setTmpData(element.populateRecords("Parts"));
}

X++ code to identify multiple selected records in Grid

Steps :
1. Create a new method on form and copy the following code.
2. Next create a button on form . and call the method on the button click event.
(for the button property makesure the Multiselect should be set to yes , or else by default for multiple selection system will disable the buttons)

void checkSelectedRecords()
{
InventTable inventLocal;
;
//getFirst method gets all the selected records in the grid
inventLocal = InventTable_ds.getFirst(true);

while (inventLocal)
{
info(strfmt("You selected Item %1",inventLocal.ItemId));
// get the next selected record
inventLocal = InventTable_ds.getNext();
}
}

As shown below ..

X++ code to hide content pane in ax2009

This is for developers , not for endusers.As you know it will irritate during developemnt since it is appearing on top of all windows when we open form.

static void hideContentPaneWindow(Args _args)
{

#WinApi
HWND contentPane = WinApi::findWindowEx(WinAPI::findWindowEx(infolog.hWnd(), 0, 'MDIClient', ''),0,'ContentFrame','' );
;
if (contentPane)
WinApi::ShowWindow(contentPane,#SW_HIDE); // To restore use #SW_RESTORE
}

Get AX4.0 look and feel back in Ax2009

You all might be aware that all forms in Ax2009 are behaving like independent application forms.i,e When you open any form it will get open outside the application.

So following are the two solutions to open forms in same workspace as in Ax4.0
1. Change the formdesign property windowtype(from standard to workspace).this you have to do for all the forms which is time cosuming.
2. Or else Add following line in the init method of SysSetupFormRun class.
before super() as shown in the following code

public void init()
{

//at run-time you are setting property to workspace.
this.form().design().windowType(FormWindowType::Workspace);
super();

SysSecurityFormSetup::loadSecurity(this);
this.dimensionFieldCtrls();
this.inventStorageDimFieldCtrls();

if (this.isWorkflowEnabled())
{
workflowControls = SysWorkflowFormControls::construct(this);
workflowControls.initControls();
}
}

Security Keys in Ax

Dynamics Ax provides following keys to provide the security for application

1.License Keys :
First Level Security , specifies what all featues/modules/developemnt tools we can access in the standard product.License Keys will be used after installation to unlock the product.License Keys will be issued by the microsoft for partners/vendors to develop vertical/generic solutions.

2.Configuration Keys :
Second Level Security , To Enable/Disable the object/feature for all the users.

3.Security Keys :
If you want to enable/disable object/features to group of users.

4. Record Level security :
Basically it deals with the data , if you want to restrict the viewing of records per user group than we setup record level security.

Dynamics Ax Systemclass for RECID

As you all know that Dynamics Ax uses recid(Record Id)to uniquelly identify a record in the database.
Advantage of RecId
1.By default system uses Recid as primary index,so if query optimizer didn't find any index to use then it will use RecId.

Dyamics Ax uses SystemSequence class(AOT->SystemDocumentation->Classes) to generate recId for table.
Using SystemSequence class you can reserve RECID's for your table.
Ax Kernel uses SystemSequences Table to generate the Recid for table as shown below
Goto AOT->SystemDocumentation->Tables->SystemSequences ,

X++ code to write data to XML File

static void CreateXml(Args _args)
{
XmlDocument xmlDoc; //to create blank XMLDocument
XmlElement xmlRoot; // XML root node
XmlElement xmlField;
XmlElement xmlRecord;
XMLWriter xmlWriter;
InventTable inventTable;
DictTable dTable = new DictTable(tablenum(InventTable));
DictField dField;
int i, fieldId;
str value;
#InventTags
;

xmlDoc = XmlDocument::newBlank();
xmlRoot = xmlDoc.createElement(#ItemRootNode);

// Loop through all the records in the inventTable
while select inventTable
where inventTable.ItemGroupId == "Parts"
{
// Create a XmlElement (record) to hold the
// contents of the current record.
xmlRecord = xmlDoc.createElement(#ItemRecords);
// Loop through all the fields in the record
for (i=1; i<=dTable.fieldCnt(); i++)
{
fieldId = dTable.fieldCnt2Id(i);
// Find the DictField object that matches
// the fieldId
dField = dTable.fieldObject(fieldId);

// Skip system fields
if (dField.isSystem())
continue;
// Create a new XmlElement (field) and
// have the name equal to the name of the
// dictField
xmlField = xmlDoc.createElement(dField.name());
// Convert values to string. I have just added
// a couple of conversion as an example.
// Use tableName.(fieldId) instead of fieldname
// to get the content of the field.
switch (dField.baseType())
{
case Types::Int64 :
value = int642str(inventTable.(fieldId));
break;
case Types::Integer :
value = int2str(inventTable.(fieldId));
break;
default :
value = inventTable.(fieldId);
break;
}
// Set the innerText of the XmlElement (field)
// to the value from the table
xmlField.innerText(value);
// Append the field as a child node to the record
xmlRecord.appendChild(xmlField);
}
// Add the record as a child node to the root
xmlRoot.appendChild(xmlRecord);
}
// Add the root to the XmlDocument
xmlDoc.appendChild(xmlRoot);
// Create a new object of the XmlWriter class
// in order to be able to write the xml to a file
xmlWriter = XMLWriter::newFile(@"c:\Items.xml");
// Write the content of the XmlDocument to the
// file as specified by the XmlWriter
xmlDoc.writeTo(xmlWriter);

//Open the file in Internet Explorer
WINAPI::shellExecute("c:\Items.xml");
}

X++ code to Read/Write Dynamics Ax data to excel

Writing Data to Excel file
How it works
1. Use SysExcelApplication class to create excel file.
2. Use SysExcelWorkbooks and SysExcelWorkbook to create a blank workbook(by
default 3 worksheets will be available).
3. Use SysExcelWorkSheets to select worksheet for writing data.
4. SysExcelCells to select the cells in the excel for writing the data.
5. SysExcelCell to write the data in the selected cells.
6. Once you done with write operation use SysExcelApplication.visible to open
file.

static void Write2ExcelFile(Args _args)
{

InventTable inventTable;
SysExcelApplication application;
SysExcelWorkbooks workbooks;
SysExcelWorkbook workbook;
SysExcelWorksheets worksheets;
SysExcelWorksheet worksheet;
SysExcelCells cells;
SysExcelCell cell;
int row;
;

application = SysExcelApplication::construct();
workbooks = application.workbooks();
workbook = workbooks.add();
worksheets = workbook.worksheets();
worksheet = worksheets.itemFromNum(1);
cells = worksheet.cells();
cells.range('A:A').numberFormat('@');

cell = cells.item(1,1);
cell.value("Item");
cell = cells.item(1,2);
cell.value("Name");
row = 1;
while select inventTable
{
row++;
cell = cells.item(row, 1);
cell.value(inventTable.ItemId);
cell = cells.item(row, 2);
cell.value(inventTable.ItemName);
}
application.visible(true);
}

Reading Data from Excel File
static void ReadExcel(Args _args)
{

SysExcelApplication application;
SysExcelWorkbooks workbooks;
SysExcelWorkbook workbook;
SysExcelWorksheets worksheets;
SysExcelWorksheet worksheet;
SysExcelCells cells;
COMVariantType type;
int row;
ItemId itemid;
Name name;
FileName filename;


;

application = SysExcelApplication::construct();
workbooks = application.workbooks();
//specify the file path that you want to read
filename = "C:\\item.xls";
try
{
workbooks.open(filename);
}
catch (Exception::Error)
{
throw error("File cannot be opened.");
}

workbook = workbooks.item(1);
worksheets = workbook.worksheets();
worksheet = worksheets.itemFromNum(1);
cells = worksheet.cells();
do
{
row++;
itemId = cells.item(row, 1).value().bStr();
name = cells.item(row, 2).value().bStr();
info(strfmt('%1 - %2', itemId, name));
type = cells.item(row+1, 1).value().variantType();
}
while (type != COMVariantType::VT_EMPTY);
application.quit();
}

X++ code to create a customized lookup on form

Override the lookup method on Formdatasource field(on which you want to show lookup) , and copy the following code to your method.
Comment the super() method in the lookup.

public void lookup(FormControl _formControl, str _filterStr)
{

SysTableLookup sysTableLookup; // systemclass to create //customlookup
Query query;
QueryBuildDataSource qbd;

;
sysTableLookup = SysTableLookup::newParameters(
tablenum(InventTable),
_formcontrol);

// Construct query on the table,
// whose records you want to show as lookup.
query = new Query();
qbd = query.addDataSource(tablenum(InventTable));
qbd.addRange(fieldnum(InventTable,ItemType)).value(SysQuery::value(enum2str
(ItemType::Item)));

// add the fields to the lookup list
sysTableLookup.addLookupfield(fieldnum(InventTable,ItemId));
sysTableLookup.addLookupfield(fieldnum(InventTable,ItemName));

// pass the query as parameter
// system will show the records in the lookup
// as per your query
sysTableLookup.parmQuery(query);
sysTableLookup.performFormLookup();

}

X++ code to find the Stock of Item by Date

static void findOnHand_ByDate(Args _args)
{

InventDim inventDim;
InventDimParm inventDimParm;
Itemid itemid;
InventOnHand inventOnHand = new InventOnHand();
InventSumDateDim inventSumDateDim;
TransDate transDate;
;

// take a sample item for testing
itemid = "20 MM RMC";
transDate = 13\01\2010;

// take a combination of dimension , against which you want to find the stock
inventDim.InventLocationId = "GW";

//Set the flag for the selected dimensions as active.
inventDimParm.initFromInventDim(inventDim);

//initialize the inventSumDateDim with Date,item,dimension and dim paramter

inventSumDateDim = InventSumDateDim::newParameters(transDate,
itemid,
inventDim,
inventDimParm);


// Retrieve the onhand info
info(strfmt("PostedQty: %1",inventSumDateDim.postedQty()));
info(strfmt("DeductedQty: %1",inventSumDateDim.deductedQty()));
info(strfmt("ReceivedQty: %1",inventSumDateDim.receivedQty()));

}

X++ Code to find OnHand Stock for Item

In Dynamics Ax , use InventOnHand class for finding the stock of an item as shownbelow


static void findOnHand(Args _args)
{

InventDim inventDim;
InventDimParm inventDimParm;
Itemid itemid;
InventOnHand inventOnHand = new InventOnHand();
;

// take a sample item for testing
itemid = "20 MM RMC";

// take a combination of dimension , against which you want to find the stock
inventDim.InventLocationId = "GW";

//Set the flag for the selected dimensions as active.
inventDimParm.initFromInventDim(inventDim);

//initialize the inventonhand with item,dimension and dim paramter

inventOnHand.parmItemId(itemid);
inventOnHand.parmInventDim(inventDim);
inventOnHand.parmInventDimParm(inventDimParm);

// Retrieve the onhand info
info(strfmt("Available Physical: %1",
inventOnhand.availPhysical()));
info(strfmt("On order: %1",inventOnhand.onOrder()));

}

Dynamics Ax 2009 Layers

Dynamics AX 2009 consists of sixteen application object layers that contain all the
elements you see in the AOT.
These layers can be looked at as an onion with multiple layers. In the middle is the
core application in the SYS layer and the outermost layer is the user layer USR.
Therefore, when any application element is being executed the system will look at
the outermost code layer first to see if there is any code for that element; if not, it peels a layer off the onion, and tries the next layer. When it hits a layer where the element exists, it will use the code from this layer, and will not continue to peel off layers to find code for that element in the innermost layers.

Layers with their description

SYS The standard application is implemented at the lowest level,
the SYS layer.The application objects in the standard
application can never be deleted.

GLS Country/region specific changes will be developed in GLS
Layer.For e.g as you all know that Tax structure differs
from country to country.So such localization functionality
can be developed in GLS layer.

HFX HFX is an application object patch layer reserved by
Microsoft for future patching or other updates.

SL1, SL2,or SL3 A layer where the distributor can implement
vertical partner solutions.

BUS When a business partner creates their own generic solution,
their modifications are saved in the BUS layer and the top-
level application objects are used.

VAR Value Added Resellers (VAR) can make modifications or new
developments to the VAR layer as specified by the customers
or as a strategy of creating an industry-specific solution.
Such modifications are saved in the VAR layer.

CUS The supervisor or administrator of an end user installation
might want to make modifications that are generic to the
company. Such modifications are saved in the CUS (CUStomer)
layer.

USR End users might want to make their own modifications, such
as in their reports.These modifications are saved in the USR
layer.

X++ code to create and post Inventory Movement Journal

Following is the sample job to show how we can create and post movement journal by making use of available api's in the Dynamics Ax.

static void createMovJournal(Args _args)
{
InventJournalTable journalTable;
InventJournalTrans journalTrans;
InventJournalTableData journalTableData;
InventJournalTransData journalTransData;
InventTable inventTable;
InventDim inventDim;
Counter cnt;
InventJournalCheckPost journalCheckPost = new InventJournalCheckPost();
;

journalTableData = JournalTableData::newTable(journalTable);
journalTransData = journalTableData.journalStatic().newJournalTransData(journalTrans,journalTableData);

// Init JournalTable

journalTable.clear();

journalTable.JournalId = journalTableData.nextJournalId();
journalTable.JournalType = InventJournalType::Movement;
journalTable.JournalNameId = journalTableData.journalStatic().standardJournalNameId(journalTable.JournalType);

journalTableData.initFromJournalName(journalTableData.journalStatic().findJournalName(journalTable.JournalNameId));

// Init JournalTrans
select firstonly inventTable;
for(cnt=1;cnt<10;cnt++)
{
journalTrans.clear();
journalTransData.initFromJournalTable();

journalTrans.TransDate = systemdateget() + 1 div 2;
journalTrans.ItemId = inventTable.ItemId;
journalTrans.Qty = 100;
journalTrans.CostAmount = 100;

// Dimension details

inventDim.InventLocationId = 'GW';
journalTrans.InventDimId = InventDim::findOrCreate(inventDim).inventDimId;

journalTransData.create();


}

journalTable.insert();

// Call the static method to post the journal
if(InventJournalCheckPost::newPostJournal(journalTable).validate())
InventJournalCheckPost::newPostJournal(journalTable).run();


}

X++ NumberSequence Code to generate numbers

Axapta uses following classes for generating numbers against numberseq code.

1.NumberSeq class--> Main class which will generate,assigns numbers and vouchers for
references.
2.NumberSeqReference--> Used to find the reference.

static void numberSeq_Demo(Args _args)
{

NumberSeq numberSeq;
;
numberSeq = numberSeq::newGetNum
(NumberSeqReference::findReference
(typeid2extendedtypeid(typeid(vendAccount))));

info(numberSeq.num());
}

How it works
1.NumberSeq Table act as master table for numberseq code , which stores
format to be generated , next sequence etc.
2.NumberSequenceReferences stores all the references and their corresponding
numberseq codes.
3.As shown in the above code , NumberSeq class needs numberseqreference ,
i,e "EDT. Unique Id for the Process " So first get the references by
passing an EDT as parameter to the findReference method of numberseqreference
class.Than you can call numberSeq.num() method to generate the number
for you.
4.Use NumberSeqFormHandler class if you want to use the numbersequencs on form.

Axapta(X++) Glossary with their definition

Widely used Axapta Terms and their Definition

ALC

Microsoft Dynamics AX Label Description files have the extension .alc. Also see ALD and ALI.

ALD

Label data files have the extension .ald (AX Label Data). Also see ALC and ALI.

ALI

Microsoft Dynamics AX Label Index files have the extension .ali. Also see ALC and ALD.

AOS

Application Object Server is windows service used to coordinate with different components of Dynamics Ax.

AOT

Application object tree , repository that stores metadata information about the objects created in Axapta.

Base data

Data which is customer-dependent. Examples: Customers, Vendors, Items.
This is often data from an existing system, which must be entered or imported into
Microsoft Axapta.


Control

Graphical object, such as a text box or command button that you put on a form or
report to display data, perform an action, or make the form or report easier to
read.

CRUD

An abbreviation for the four basic database operations: Create, Read, Update,
Delete.

DCOM

Distributed COM

efault data

Data which is customer-independent. Examples: Zip codes, Address formats, Time
Intervals, Units, Unit conversions, VAT parameters, Transaction texts.
Note
When a user modifies default data, it becomes custom data, which is customer-
dependent. This means that default data can sometimes be customer dependent,
because of historic reasons, such as Chart of Accounts.


Domain

Collection of one or more companies. Domains enable you to define user groups that
have the same permissions in more than one company while allowing the same user
groups to have other permissions within other companies.

EDT

Extended Data Type: a user-defined data type based on a primitive data type or
container.

IDE

Integrated Development Environment. MorphX is the Microsoft Dynamics AX IDE.

IntelliMorph

The Runtime Environment embedded in Microsoft Dynamics AX, that draws menus, forms,
and reports for Windows- and Web-clients with the correct contents, size, and
layout according to:
the language your texts are displayed in.
what features you can access.
how wide you want the fields on your installation.
the formats you are using for dates and numbers.

MorphX

The Development Environment of Microsoft Dynamics AX, including:
Data Dictionary
Tools for creating menus, forms and reports for Windows- and Web clients
Compiler and debugger for the object oriented programming language X++
Version control system
Label (multi language text) systems

Overload

Provide more than one method with the same name but with different signatures to
distinguish them.
Overloading is not supported by X++. Also see override.

Override

Replace the superclass's implementation of a method with one of your own. The
signatures must be identical.

Note
Only non-static methods may be overridden.

Record ID

A record ID uniquely identifies a row of data in a table. Record IDs are integers. They are assigned and managed by Microsoft Dynamics AX.

super ()

Reference to the system class that contains the required method. When super() is used, the system method is automatically used.

this

Reference to the current object. this is frequently used as a parameter to methods
that need an object reference.for e.g at Table level if it used gives you the
selected record.

TTS

Transaction Tracking System. For more information, see Transaction Integrity.

WinAPI

Windows Application Programming Interface. Contains System level API's
like "WinAPI::shellExecute("file.exe");" for opening applications from axapta.

Copying License in Dynamics Ax

Axapta stores the License data in the following two tables.

1.SysLicenseCodeSort
2.SysConfig

So if you copy data of these tables(from Running instance) and import at your instance , this will serve your purpose.

GlobalCache (alternative to GlobalVariables in X++)

Many times because of flawed implementation designs, we often need global variables. We may use a table with a key field and a container field for this purpose, but the simplest way of doing this will be using a Global Cache.
A global cache is an instance of class - SysGlobalCache, which is nothing but a Map containing Maps with Userid as Key. These Maps contain the actual value and a key.
In Ax, we have three(infact 4) Global Caches - Infolog.globalCache(), Appl.globalCache(), ClassFactory.GlobalCache().

How to use:
To Set a Value:
static void GlobalCacheSet(Args _args)
{
SysGlobalCache globalCache;
;
globalCache = ClassFactory.globalCache();
globalCache.set(curuserid(), 1, "One");
}
To Get the Value:
static void GlobalCacheGet(Args _args)
{
SysGlobalCache globalCache;
;
globalCache = ClassFactory.globalCache();
print globalCache.get(curuserid(), 1);
globalcache.remove(curuserid(), 1);
pause;
}

In the above the example, we can also use Infolog.globalCache() or Appl.globalCache().

Why do we have three Caches?

Its simple, the term "Caching" comes when there is something to do with Performance.

Infolog Object resides in Client and Application Object resides in Server.
To share your global variable across the network and accept the performance penalty of a client/server call, use the infolog variable (Info class) or appl variable (Application class) instead of ClassFactory.

ClassFactory is a special class, which has instances residing at both server and client. At run time, two instances of the ClassFactory class exist, and they share name classFactory. However confusing the implementation details might sound, this is a powerful concept. When you call a method on classFactory from code running on the client, you are calling the classFactory object on the client tier; when you call a method on classFactory from code running on the server, you are calling the classFactory object on the server tier. Remember this when debugging the ClassFactory class.