Hi Friends,
First of all would like to wish you all Very "Happy and Dynamics new year -2012".
You all might be aware/heard of new changes related to worklow architecture and development.
So this post basically addresses,
1. Workflow Architecture changes
2. Workflow Development wizards
3. Generic class for submit/resubmit events on all workflows in AX.
1. Workflow Architecture changes
In 2012, AOS service has gone tremendous changes like
- Now you can directly host WCF services on AOS.
- Earlier version we were using IIS to interact with WWF(Windows workflow foundation) and
WCF (Windows communication foundation).
- Because of above change, now no need to install workflow component separately
- Just run the workflow configuration wizard (available in System administration->Setup)
- Workflow templates/configuration were made available across companies/per company level.
- Workflow template is renamed to Workflow types
2. Workflow Development through wizards.
Let us develop workflow for
'Customer approval- New created customer should be approved through workflow'
Step 1:
Create a query for custTable say 'CustApprWorkflowQry' in AOT->Queries
Step 2:
Duplicate enum 'PurchReqWorkflowState' and rename it to 'CustApprWorkflowState' and drag it to CustTable Table.
Step 3:
Override 'canSubmitToWorkflow' method on Table->CustTable and paste below code.
//BP Deviation Documented
public boolean canSubmitToWorkflow(str _workflowType = '')
{
boolean ret;
ret = this.RecId != 0 && this.CustApprWorkflowState ==
CustApprWorkflowState::NotSubmitted;
return ret;
}
Create new method on CustTable as below to update worklow state during its life cycle.
//BP Deviation documented
public static void UpdateCustWorkflowState(RefRecId _recId, CustApprWorkflowState _state)
{
CustTable custTable = CustTable::findRecId(_recId, true);
ttsBegin;
custTable.CustApprWorkflowState = _state;
custTable.update();
ttsCommit;
}
Step 4:
Create workflow type (template/configuration) through wizard available in 2012.
Run wizard as below:
AOT->Workflow-> Workflow types (Right click ->Add-Ins-> workflow type wizard...
Specify values as shown in below image

Click on next, as shown in below image wizard will create workflow eventhandlers class and menu items for you.

Paste below code to update workflow state.
//BP Deviation Documented
public void started(WorkflowEventArgs _workflowEventArgs)
{
CustTable::UpdateCustWorkflowState(_workflowEventArgs.parmWorkflowContext().parmRecId(), CustApprWorkflowState::Submitted);
}
//BP Deviation Documented
public void completed(WorkflowEventArgs _workflowEventArgs)
{
CustTable::UpdateCustWorkflowState(_workflowEventArgs.parmWorkflowContext().parmRecId(), CustApprWorkflowState::Completed);
}
//BP Deviation Documented
public void canceled(WorkflowEventArgs _workflowEventArgs)
{
CustTable::UpdateCustWorkflowState(_workflowEventArgs.parmWorkflowContext().parmRecId(), CustApprWorkflowState::PendingCancellation);
}
Step 5:
Create workflow approval through wizard available in 2012.
Run wizard as below:
AOT->Workflow-> Approvals (Right click ->Add-Ins-> Approval wizard...
Specify values as shown in below image
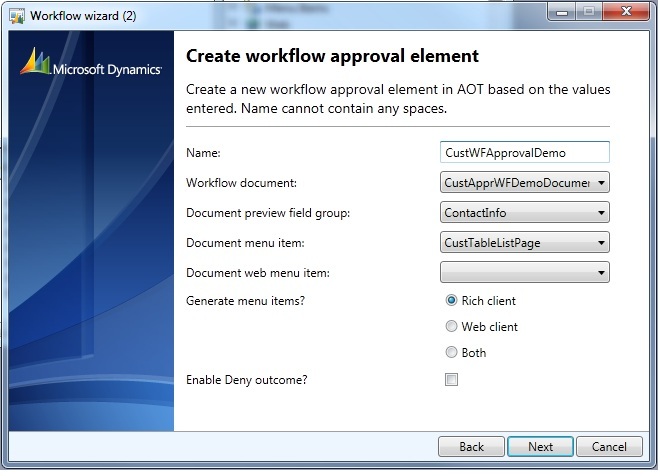
Click on next, as shown in below image wizard will create workflow element eventhandlers and menu items for you.

Paste below code to update workflow state.
//BP Deviation Documented
public void started(WorkflowElementEventArgs _workflowElementEventArgs)
{
CustTable::UpdateCustWorkflowState(_workflowElementEventArgs.parmWorkflowContext().parmRecId(), CustApprWorkflowState::Submitted);
}
//BP Deviation Documented
public void returned(WorkflowElementEventArgs _workflowElementEventArgs)
{
CustTable::UpdateCustWorkflowState(_workflowElementEventArgs.parmWorkflowContext().parmRecId(), CustApprWorkflowState::Returned);
}
//BP Deviation Documented
public void changeRequested(WorkflowElementEventArgs _workflowElementEventArgs)
{
CustTable::UpdateCustWorkflowState(_workflowElementEventArgs.parmWorkflowContext().parmRecId(), CustApprWorkflowState::ChangeRequest);
}
//BP Deviation Documented
public void completed(WorkflowElementEventArgs _workflowElementEventArgs)
{
CustTable::UpdateCustWorkflowState(_workflowElementEventArgs.parmWorkflowContext().parmRecId(), CustApprWorkflowState::Approved);
}
//BP Deviation Documented
public void canceled(WorkflowElementEventArgs _workflowElementEventArgs)
{
CustTable::UpdateCustWorkflowState(_workflowElementEventArgs.parmWorkflowContext().parmRecId(), CustApprWorkflowState::PendingCancellation);
}
Step 6:
Enable workflow on CustTableListPage form and alos drag field CustApprWorkflowstate on form overview grid, as below
CustTableListPage->Design, set properties as below

Step 7:
Download below class to activate workflow on submit and resubmit.
This is generic class and with little modification can be used for all different worklow's in AX.
Download Class XPO :
Once you download and import class, change below menu-items associated with submit and resubmit actions.

Step 8:
Run Incremental CIL generation, AOT->Right click-> Incremental CIL generation
You are done with development and can configure workflow in AR->Setup
After activating above workflow configuration test it by creating new customer in CustTableListPage form.
Hope you enjoyed this new style of workflow development which will take 1-2 hours for any new basic workflow approval :)